Tuesday, November 5, 2019

NodeJs: Module caching

In NodeJs, whenever we import a module by using require() statement, the corresponding module object is get cached after the first time it is loaded. Now own-wards, if we reload the same module even in different file, we will get a cached copy of the module provided "require.cache" is not modified( has been discussed very clearly in https://bambielli.com/til/2017-04-30-node-require-cache/ ).

This can be understood by following example. Here, I am using 4 classes:

1) my-module.js
class myModule {
constructor(myName) {
this.myName = myName;
}
setName(name) {
this.myName = name;
}
}
module.exports = new myModule("defaultName");
Here, my-module is having a field "myName" with default value as "defaultName". This field can be changed either by constructor or by function setName()

2) my-class1.js
var myModule = require('./my-module');
class myClass1 {
getName() {
console.log("Value of myName in myClass1 object = "+myModule.myName);
}
changeName(newName) {
myModule.setName(newName);
}
}
module.exports = myClass1;
Here, my-class1.js is importing the module "my-module" and having two functions like getName() and changeName() to print/change value of myName field of "my-module"

3) my-class2.js
var myModule = require('./my-module');
class myClass2 {
getName() {
console.log("Value of myName in myClass2 object = "+ myModule.myName);
}
}
module.exports = myClass2;
Here, it is importing same module i.e. "my-module", but having only one function getName() to print the myName field of "my-module". So, by default the function getName() should print here default value of myName field i.e. "defaultName"

4) test-class.js
var myClass1 = require('./my-class1');
var myClass1Obj = new myClass1();
myClass1Obj.changeName("Jitendra");
myClass1Obj.getName();

var myClass2 = require('./my-class2');
var myClass2Obj = new myClass2();
myClass2Obj.getName();
Here, we are first importing my-class1 and creating its object. Then through this object we are changing the default value of myName field of "my-module" and then printing the value of myName field.

After this, we are importing my-class2 and creating its object and just printing the value of myName field. Here, the value printed is same as the value printed by myClass1 object. That means both my-classs1 and my-class2 are having the same object of "my-module"  although both the classes are separately importing that module.

So here the class my-class1 is first importing the my-module and then object of my-module is getting cached and when my-class2 is going to import the same module, its getting the cached object of my-module instead of fresh new object.

If we run test-class.js by node command like "node test-class", we will get output like:

Value of myName in myClass1 object = Jitendra
Value of myName in myClass2 object = Jitendra
Saturday, November 2, 2019

NodeJs: Event emitter: Synchronous - Asynchronous

We generally use Event emitter class in NodeJs to implement publish subscribe mechanism. Most of us think that this event emitter works totally in asynchronous way. But, its not true. If we take it in scenario wise, we can get two scenarios:

Scenario 1) Suppose event emitter class is emitting two different events say "event1" and "event2". Here, we usually think that the handlers of both of these events will run asynchronously. But, the fact is that which ever event is triggered first, its handler will run first irrespective of the fact that which event handler is associated first with the event emitter object. e.g.

const EventEmitter = require('events');
class MyEmitter extends EventEmitter {}
const myEmitter = new MyEmitter();
myEmitter.on('event1', handleEvent1);
myEmitter.on('event2', handleEvent2);
function handleEvent1() {
console.log('an event1 started!');
  let x=0;
  for(let i=0; i<100; i++){
x = x + i;
  }
  console.log('an event1 ended!');
}
function handleEvent2() {
console.log('an event2 started!');
  let x=0;
  for(let i=0; i<1000000000; i++){
x = x + i;
  }
  console.log('an event2 ended!');
}
myEmitter.emit('event2');
myEmitter.emit('event1');
 The output of the above code is:

C:\Users\singh\Desktop\delete2>node event-emit-test2
an event2 started!
an event2 ended!
an event1 started!
an event1 ended!
From above output, its clear that "event2" is being triggered first and although its handler is taking more time as compared to handler of "event1", but till the time handler of event2 is running, the handler of event1 is waiting. So, here whichever event is triggered first, it will complete first.

Scenario 2) Suppose event emitter is emitting same event 2 times and two different handlers are associated with the same event. So, here the rhythm of association matters and which ever handler is associated first, will complete first then the second event handler will start. e.g.

const EventEmitter = require('events');
class MyEmitter extends EventEmitter {}
const myEmitter = new MyEmitter();
myEmitter.on('event', handleEvent1);
myEmitter.on('event', handleEvent2);
function handleEvent1() {
console.log('an event1 started!');
  let x=0;
  for(let i=0; i<1000000000; i++){
x = x + i;
  }
  console.log('an event1 ended!');
}
function handleEvent2() {
console.log('an event2 started!');
  let x=0;
  for(let i=0; i<10; i++){
x = x + i;
  }
  console.log('an event2 ended!');
}
myEmitter.emit('event');
The output is:
C:\Users\singh\Desktop\delete2>node event-emit-test2
an event1 started!
an event1 ended!
an event2 started!
an event2 ended!
Here, the output is clearly showing that in this scenario, the rhythm of event handler association is being followed and handlers are running in Synchronous way.

If needed we can force these handlers to run in asynchronous way by using "setImmediate" and "process.nextTick". e.g.

const EventEmitter = require('events');
class MyEmitter extends EventEmitter {}
const myEmitter = new MyEmitter();
myEmitter.on('event', () => setImmediate(handleEvent1));
myEmitter.on('event', () => process.nextTick(handleEvent2));
function handleEvent1() {
console.log('an event1 started!');
  let x=0;
  for(let i=0; i<100; i++){
x = x + i;
  }
  console.log('an event1 ended!');
}
function handleEvent2() {
console.log('an event2 started!');
  let x=0;
  for(let i=0; i<1000000000; i++){
x = x + i;
  }
  console.log('an event2 ended!');
}
myEmitter.emit('event');
The output is:
C:\Users\singh\Desktop\delete2>node event-emit-test
an event2 started!
an event2 ended!
an event1 started!
an event1 ended!
It is clear from output that even if handleEvent1 is associated first and handleEvent2 is associated 2nd with event named as "event", but handleEvent2 is being triggered and completed first based on "setImmediate" and "process.nextTick".

Thursday, January 10, 2019

How to create repository in GitHub and manage it from Visual Studio version 2017

GitHub is a repository available online where any developer can register by providing his email id. Once you have registered you can create a new repository there by following below mentioned steps:

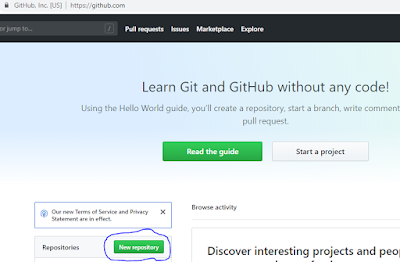
  1. Login into your github account and click on New Repository button
  2. Fill all the required details in the form that opens after clicking on the New Repository Button. Don't forget to select the checkbox for "Initialize this repository with a ReadMe". It will be helpful in immediate cloning.
  3. Now, once you click on Create repository button, your new repository will be ready.
  4. Now, you can take this repository to your local environment by number of ways like by Opening on Desktop, Downloading the zip file for this repository or by creating a fork or clone of this repository. The best and secure way is to use fork or clone. So, click on Clone or download drop down and copy the URL. 
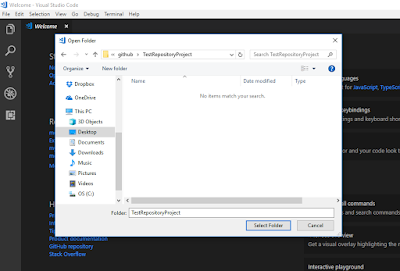
  5. Now, Open your Visual studio code editor and click on Top Menu -> Files -> Open folder and then select the folder in which you want to download your cloned project.
  6. Now go to the Menu -> View -> Terminal and execute the command like git clone https://github.com/jksnu/TestRepository.git in the terminal window in visual studio code
  7. Now, your fork or cloned project is downloaded in your local. You can see your ReadMe.md
Thus, here, we understood the following things like:
  1. How to register in GitHub
  2. How to create your repository in GitHub
  3. How to Clone your repository in GitHub
  4. How to Checkout your cloned repository from GitHub to your local through Visual Studio code editor
In my next blog, I will discuss about the different steps involved in committing your code to your GitHub repository.

Feel free to add your suggestion or comments.