Here, we will discuss about how to publish messages to AWS SQS queue by NodeJs. To implement it, we have to follow below steps:
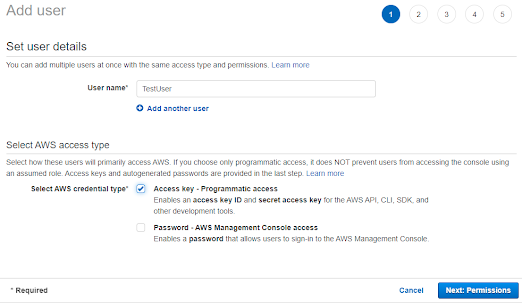
- Create an user in AWS and note down its access key Id and secret access key
- Create a SQS queue and note down its url
- Save user credential in a shared file in your local
- Install aws-sdk library
- Create a simple node express application with route for publishing message to SQS
Now, lets discuss each steps one by one.
1) Create an user in AWS and note down its access key Id and secret access key: I have discussed in detail about this steps in my previous blog under the heading "File handling in AWS S3 by NodeJs". I am giving the link below. Please go through it.
2) Create a SQS queue and note down its url: First open AWS console and go to the SQS service and click on the "Create Queue" button. Now, add the Queue name and keep other things with default value. Further click on "Create Queue" button at the bottom.


3) Save user credential in a shared file in your local: In this steps, we should save the user credential so that node js application can read it while establishing connection with AWS. We can refer below AWS documentation for this step:
5) Install aws-sdk library: Create a simple node js application and Use the command like npm install aws-sdk
6) Create a simple node express application with route for publishing message to SQS: Here, we are creating a very simple node express application along with two routes:
a) "/addMessage": This is being used to add messages in SQS queue.
b) "/getMessage": This is being used to get messages from the SQS queue.
I am providing here the code for your reference:
const express = require('express');
const dotenv = require('dotenv');
const path = require('path');
const AWS = require('aws-sdk');
AWS.config.update({region: 'us-east-1'});
const sqs = new AWS.SQS();
const app = express();
app.use(express.json());
dotenv.config({
path: path.join(__dirname, './.env')
});
app.listen(8000, () => {
console.log(`Listening port 8000`);
});
//Add a message to SQS
app.post('/addMessage', async(req, res) => {
try {
const params = {
MessageBody: req.body.MessageBody,
QueueUrl: process.env.SQS_URL
};
const result = await sqs.sendMessage(params).promise();
res.send(result)
} catch (error) {
console.log(error);
throw error;
}
});
//Receive a message to SQS
app.get('/getMessage', async(req, res) => {
try {
const params = {
QueueUrl: process.env.SQS_URL
};
const result = await sqs.receiveMessage(params).promise();
res.send(result)
} catch (error) {
console.log(error);
throw error;
}
});